In the complex realm of underground operations, various mishaps can occur involving drill pipes, drill collars, and other essential downhole tools. This blog refers to the general terms for various accidents involving drill pipes, drill collars, and other downhole tools and auxiliary tools that occur underground. The drill tools left in the well after an accident are referred to as “fish,” with the top end of the “fish” called the “fish head” or “fish top.”
Common Drill Tool Accidents and Their Causes
Drill Tool Breakage:
Breakage of the Drill Pipe Body
This occurs due to issues such as poor quality of the drill pipe, thinning of the pipe wall, marks or damage from slips, and various signs of corrosion, which reduce the drill pipe’s strength. The drill pipe can break under significant tensile and torsional forces when downhole (e.g., during sticking, jumping, strong pulls, or hard turns). This typically occurs within 1.2 meters of the box end.
Breakage of the Drill Collar at the Coarse Thread
The drill collar is much stiffer, while the coarse thread section is significantly smaller. When the drill collar is working downhole, it must withstand combined loads of compression, torsion, and bending. Poor quality of thread processing or improper operation can lead to breakage. This often occurs at the root of the female thread’s relief groove or stress concentration points at the root of the male thread.
Tool Disconnect
Disconnect refers to the condition where the threads are undamaged, but various reasons (such as sticking, reverse rotation, or back-rotation) cause the threads to disengage.
Tool Slippage
This refers to the threads pulling apart and slipping off due to force. The main reasons include excessive unloading of the threads, wear on the threads, improper tightening, erosion from drilling fluid, and non-standard thread profiles.
Handling Drill Tool Accidents
After a drill tool accident occurs, it should be addressed promptly based on the nature of the accident. If it is a tool disconnect or slippage, immediate action should be taken to retrieve the “fish” using downhole tools. If the retrieval fails, the situation should be handled as a drill tool breakage.
After a drill tool breakage, the shape of the broken end, the size of the water hole, and the outer diameter should be assessed to determine the shape of the “fish head” and select appropriate retrieval tools. In addition to commonly used tools, special designs can also be implemented.
Standard Tools for Handling Drill Tool Accidents
- Catching bucket
- Retrieval spear
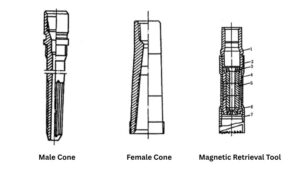
- Male cone
- Female cone
- Safety joint
- Imprint
- Wall hook
- Reverse joint
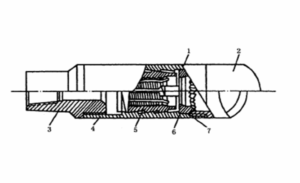
- Magnetic retrieval tool
Cones and Tools
Device
- Joint
- Body Section
- Upper Magnetic Pole
- Liner Tube
- Magnetic Core
- Lower Magnetic Pole
Guide Shoe
Dredging tube structure
Dredging tube structure
- Flat-bottom grinding shoe
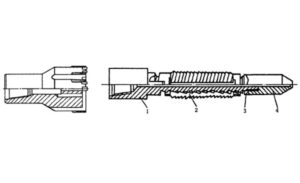
- Kawa dredging spear (1. central shaft, 2. Kawa, 3. release ring, 4. guiding shoe)
Uses of Common Dredging Tools
Male Cone
This is a commonly used tool for dredging from the inner hole of a dropped object. It is suitable for use in areas with thicker pipe walls and is typically used for dredging drill collars, drill rod joints, and thickened sections of drill rods. However, it should not be used on the main body of drill rods and casings.
Female Cone
The female cone is a tool used for dredging from the outside of a dropped object. It is not restricted by the thickness of the pipe wall but is limited by the diameter of the wellbore, generally requiring a maximum outer diameter of 10-20 mm. Therefore, it can only dredge smaller dropped objects, such as drill rods and oil pipes, and is rarely used for larger dropped objects, like drill collars and casings.
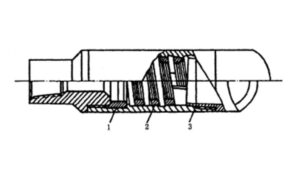
Kawa Dredging Tube
This is a tool used for dredging from the outer diameter of a dropped object. Due to its large contact area with the dropped object, it can withstand intense pulling, twisting, and vibration. This type of tool is designed with reliable sealing components, allowing for a closed space between the sealed tube body and the top of the dropped object, enabling pumping and circulation.
Each set of tools can be equipped with several different sizes of Kawa, providing a wide range of dredging applications, including drill collars, drill rod bodies, drill rod joints, casings, oil pipes, and their couplings.
Drill Tool Combinations
- General Drill Tool Combination: Kawa dredging tube + safety joint + downward impactor + drill tools
- Optimal Drill Tool Combination: Kawa dredging tube + safety joint + downward impactor + upward impactor + partial drill collar + accelerator + drill tools
- Drill Tool Combination for Large Wellbores: Wall-hook guiding shoe + Kawa dredging tube + short drill rod (2-3 m) + variable bend joint + drill tools
- Alternatively: Kawa dredging tube + safety joint + one bent drill rod + downward impactor + upward impactor + drill tools
Kawa Dredging Spear
Like the male cone, this is a commonly used tool for dredging from the inner hole of a dropped object. It has a wide range of applications, capable of dredging not only drill rods and drill collars but also casings and oil pipes, especially during internal cutting operations, where it plays an irreplaceable role compared to other dredging tools.
Steps for Handling Drill Tool Accidents:
- Preparation stage
- Dredging preparation stage
- Dredging operation stage
Prevention of Drill Tool Accidents
Causes
Fatigue failure, corrosion failure, mechanical failure, and accident failure.
Symptoms
Weight drop, pump pressure drop, reduced load on the turntable, no penetration or emptying.
Preventive Measures:
-
- A. All drill rods should be placed on the pipe rack, stacked no more than three layers, with even padding between layers using two spacer bars.
- B. Drill tools should be managed in teams and used in sets to avoid confusion, ideally using tools from the same batch with similar usage times and specifications.
- C. Long-term stored drill tools should be cleaned on both the inside and outside, ensuring that male and female threads and steps are clean. Regular inspections should be conducted for corrosion, and the tools should receive anti-corrosion treatment as needed.
- D. Problematic drill tools should be marked with paint at the problematic areas and tied with a conspicuous string.
- E. Drill tools entering the well should be thoroughly checked for steel grade, wall thickness, male and female joints, water hole diameter, measured length, and registered.
- F. Strengthen inspections of drill tools entering the well, with regular non-destructive testing.
- G. Strictly adhere to operating procedures, avoiding sudden drilling or slipping.
- H. When handling accidents, avoid repeatedly lifting and dropping heavy objects.
- I. If there are changes in pump pressure and the ground cannot identify the cause, immediately pull out the drill to check the tools.
- J. Various connection joints must be regularly disassembled and inspected, with enhanced non-destructive testing. If issues are found, they should be replaced promptly. Repaired square drill rod protective joints must be ground 3-5 times.
- K. Drill tools should be fitted with protective wires when being lifted or lowered, and should be operated smoothly without colliding with the joints at both ends of the drill rod.
- L. The threads of the drill tools must be cleaned thoroughly, carefully inspected, and lubricated, especially protective joints, which must not be damaged.
- M. The lifting of drill tools must follow the “four checks, one adjustment” operating procedure. Four checks: The rig worker checks for bending of the drill tools, the internal wrench checks the condition of the internal threads, the external wrench checks the external threads, and both internal and external wrenches check for damage and leaks on the drill tool body. One adjustment: the Kawa height should be set appropriately, approximately 0.5 mm below the male thread joint of the drill rod, to prevent bending the drill rod.
- During jointing and unjointing, large wrenches must never be used to grip the main body of the drill rod.
- O. Ensure the lifting hook is adequately secured to prevent single-ring lifting.
- P. Empty lifting hooks, drill tool columns, or single rods must not collide with the shoulder of the wellhead joint. When connecting, ensure the male and female joints are aligned. If there is swinging or jamming, avoid rotating the components quickly. If jamming occurs, the connection must be disassembled and reconnected, without forcing with a large wrench.
- Q. When connecting, follow the specified torque requirements; they must neither be too loose nor too tight.
- R. The mouse hole connection of a single rod must be tightly secured.
- The lifting short section of the drill collar must be tightly secured, without being overly tight.
- When unjointing, do not use the turntable to tighten; the large hook spring should bear a certain pulling force to ensure that the released threads are not under pressure and to prevent the drill tool column from colliding with the wellhead male joint under spring force.
- Avoid creating indentations, especially transverse indentations, which are caused mainly by large wrenches, Kawa, and dropped objects underground.
- V. Except when handling accidents, bent drill rods must not be lowered into the well, especially not using bent square drill rods; if a bent square drill rod is found, it should be replaced immediately.
- W. Do not use drill rods as grounding wires during electric welding.
- X. Under no circumstances should stretching or twisting exceed the yield strength of the drill tools.
- When using high salinity drilling fluids, corrosion inhibitors should be added to protect the drill tools.
- Z. Maintain the pH value of the drilling fluid above 9.5 to reduce corrosion and fractures.
- A1. New or repaired drill tool threads must be run in. Drill collar connections should be run in 3-5 times, and drill rod connections should be run in 2-3 times, ensuring the threads are smooth and free of burrs.
- B2. Adhere to the system of mismatched drill tools and drill tool replacement. Each mismatched drill bit should be used only once. Drill rods should be replaced every 2500-3000 meters drilled, and drill collars should be replaced every 1000-1500 meters drilled.
C3. In areas with jumping drilling, add dampers to the drill tool combination to reduce fatigue failure; if severe jumping is detected during drilling, the weight on the drill should be reduced
